Sunday, 18 August 2013

Only Negroni - Cocktail Cake Club & Negroni Cheesecake


The very thought of mixing gin with cream cheese made my stomach curdle and, had I actually gone ahead and done it, would probably have made the cream cheese curdle too.

It was time for another Secret Cake Club, the theme being “Cocktails, mocktails, and your favourite tipple”. My favourite tipple of the moment has to be a classic Negroni cocktail. My problem was how to re-interpret this in cake form.

The classic Negroni  (and I am sure that some purists will disagree with my definition – it’s the kind of drink that brings out strong opinion as to what constitutes ‘classic’) mixes equal parts of gin, bitters (usually Campari) and red vermouth over ice and tops it with a twist of orange zest. It’s a serious cocktail, a grown-up cocktail, to be consumed in a bar and definitely not beside the pool. You can keep your sunshine and tiny umbrellas and sweet blue creamy drinks – give me my underground bar in the wintertime, put a Negroni in my hand and I will be quite content.


But a Negroni cake? I honestly couldn’t see a Victoria sponge with bitter and vermouth cream-filling, or a trifle with gin-soaked sponge. My favourite dessert is cheesecake and that’s when I imagined (momentarily) throwing a block of Philadelphia and a cup of gin into a blender but there are some places a baker just shouldn’t go and I think this was one of them.

But I really, really wanted to make a cheesecake.

That’s when the idea of ‘flipping’ the cocktail came to me. I work in Education and the concept of ‘flipping’ classrooms, processes etc. is very modish right now. The basic concept is that you reverse the focus to achieve better results. So, rather than start with the Negroni and garnish with orange, start with the orange and garnish with Negroni. Baked orange cheesecake is wonderful. What could make it more wonderful? A bittersweet Negroni jelly! So that’s what I did. I made the cheesecake over the course of a day. It’s actually quite a user-friendly recipe and allows you to do other things during the chilling and baking times. I had taken a trip to my lovely friends at Gangemi’s Fine Wines and stocked up on the wherewithal for Negroni (West Winds Sabre Gin, classic Campari and Dolin Vermouth). For the rest, the local supermarket did the trick.

 A couple of things to note:

I bought blood oranges because I love how they look and taste, but regular oranges are fine.


The orange extract is optional – I wanted to make sure that the cheesecake had an intense orange flavour. If you like yours more subtle, you can omit it. Want a really alcoholic cake? Cointreau is your friend…

Clever tip from a friend, use a can of condensed milk instead of using sugar and cream – it saves you one extra step and a lot of extra beating.


There is no need to have sugar in the Negroni jelly if you want to have it more authentically bitter. My thinking was that the sugar would just tone down the intensity a little and keep things safe for the Cake Club members.

To make orange twists keep their shape (and not untwist!), wrap around a skewer or a chopstick and leave in the fridge for a couple of hours.


The thing is, it was an experiment and I had no idea if it was going to work or not. I was delighted with the beautiful smooth appearance of the cheesecake when it emerged (without a single crack!) from the oven, but a little less certain when it came time to pour the jelly on. I settled for doing this last thing at night and then went to bed, not knowing what I would wake up to in the morning. The hot jelly mixture made the whole house smell like a distillery. My clothes and hair were lightly misted with gin. It would not have been a good idea to go near any naked flames.

In the morning, releasing the cheesecake from the spring-form tin was a tense moment, but there it was. Dense cheesecake with the Negroni jelly glowing sunset-orange in a perfect layer over the top. I trimmed a little to try and was very pleased with the flavour combination as well as the texture. The cake was sweet and creamy and so very, very orangey. The biscuit base added crunch and the jelly –oh, the jelly! It had all the Negroni characteristics that I was after – herbal, floral, bitter, cold and refreshing with a little added sweetness to remind everyone that this was dessert! All that remained was to place the orange twists on top and I was ready to go.
A few air-bubbles in the jelly. Oh, well...


The venue for Cake Club this month was Frisk Small Bar in Northbridge. They specialise in gin. They have 4 pages just for gin in their drinks menu. My cheesecake, with some West Winds Sabre in the mix, was in good company.

And talking of good company, we had another huge turn-out for Cake Club and so many creative and intriguing interpretations of the “Cocktail, mocktail, tipple” theme. There were tarts with tequila, beef pies with red wine, mojito macarons, beer bread with Beersine beer cheese, mousse with whisky, and so much more.


It says a lot about the size and enthusiasm of the Cake Club that we managed to drink an espresso bar out of coffee. It’s true – they ran out. I saw a lot of coffee being bought, and even more espresso martinis. As for me, I had a classic cocktail – I had, wait for it… a Martinez. (Vermouth, gin, maraschino, and bitters)


Not a Negroni.
Shame on you for thinking I was that predictable!

(I made a Negroni when I got home...)


'Flipped' Negroni Cheesecake

For the base:

1 packet plain biscuits (I used Arnott’s Milk Arrowroot)

200g melted butter

For the cheesecake:

2 x 250g packets Philadelphia cream cheese

1 x 395g can condensed milk

The zest from 4 oranges

The juice of 3 oranges

1 tssp orange extract (optional)

 3 eggs

For the jelly topping:

1 cup water

1/3 cup caster sugar

3 leaves Titanium strength gelatine (soaked in cold water to soften) or 2 sachets of good gelatine crystals

1/3 cup gin

1/3 cup Campari

1/3 cup red Vermouth

Garnish:

Twists of orange zest

Crush the biscuits into crumbs in a food processor (or pop in a plastic bag and bash with a rolling pin). Mix with melted butter until combined. Press into the base of a springform tin and put in the fridge to chill.

Blend cream cheese, condensed milk and orange zest until smooth. Slowly add the orange juice and orange extract. When this mixture is completely blended, add the eggs and mix until just combined. (Don’t over mix or your cheesecake will have cracks in it!). Pour the mixture on top of the chilled base and bake in a 160C oven for 45 minutes until just set. Leave to cool and then place in the fridge to chill.

In a pan, over a low heat, gently warm the cup of water. Add the sugar and softened gelatine and stir until completely dissolved. Remove water from heat and add gin, Campari and Vermouth. Allow to cool for about 20 minutes then pour over cheesecake and return to the fridge to allow to set for a couple of hours (or overnight).

Remove the cheesecake from the spring-form tin and garnish with twists of orange zest.

Thursday, 8 August 2013

Source code: recipes found through the media


Lemon blondies - sticky enough but not quite as sticky as I would have liked.
Back in the day, if you wanted a recipe for a particular dish, you had to have a cookbook. And if you didn’t have that cookbook, you had to go out and get it. The other rich source of recipes was women’s magazines and I can’t have been the only one with a guilty look on my face as I tried to rip out the page with the desired recipe upon it while trying not to alert the whole of the doctor’s/dentist’s waiting-room to what I was doing.
The cookbook that we used most when I was growing up was this classic, Mary Berry’s Hamlyn All-Colour Cookbook. With the first edition published in 1970, it will come as no surprise to you that a lot of tins and packets are involved. And let’s not forget how much fun there is to be had with aspic.
 
 
It must be said that as a cookbook for a beginner it was as good a book  as one could hope for, especially where cakes and desserts were concerned. It has a place in my heart as much for practicality’s sake as for nostalgia. If you were called upon to cook, you could always find something in there. When I moved out of home, I tracked down a copy and bought one for myself.
The first cookbook that was actually mine was the nutritionally-bankrupt and whimsical “My Fun to Cook Book” by the wonderfully-named Ursula Sedgwick. It was a Christmas gift from some family friends and I kept it for years.

 
The orange, mustard, and brown psychedelic bat-wing blouse that the girl on the cover is wearing will tell you everything you need to know about the publication date. In fact, I think I had that same blouse or at least one that was very similar.
In “My Fun to Cook Book” the young would-be cook was guided through the recipes by a cartoon cat and dog. There were such gems as “Pineapple Jelly” (Buy a packet of pineapple jelly, dissolve in a pint of boiling water, pour into a bowl, put into the fridge until set) and “Sugar Bread” (Spread one piece of white bread with margarine, sprinkle with white sugar until covered, place under the grill until sugar turns brown) and other 1970’s culinary tragedies. The dog and the cat would pop up every now and then with salient warnings such as:

If you are not sure how to use a kettle, ask your mother to help you!

OR

Don’t eat this too quickly – grilled sugar can be VERY, VERY hot!

These days, of course, I have a more diverse collection of cookbooks (and I no longer own any orange-and-brown psychedelic blouses) but truth of the matter is that if I am looking for a recipe, I am more likely to search for one online before I do anything else. If I see a recipe that I want in a magazine, I will usually take a photograph of it, or use a text scanning app to record it.

Which brings us to the present day and a couple of recipes that I came upon and wanted to try. The first, red bean soup and cornbread, was in the Fresh (i.e. cooking) section of the local newspaper, The West Australian, which was on the staffroom table at work. The other, the lemon blondies, was shared on Facebook, by Megan of LittleSweet Baking.


In a more retro approach than I intended, I took a photocopy of the recipe from the newspaper although that isn't quite as retro as ripping the page out of the paper and taking it home. Besides, a few of my colleagues wanted copies of their own which meant I couldn't just steal it (Thief by name but not by nature). So I resorted to good ol’ fashioned Xerox because the scale was too big to get the right focus with the camera on my phone. I originally copied it because I wanted the recipe for the cornbread (which looked great in the newspaper colour supplement but was, understandably, less exciting in the black-and-white copy) but when I got home, I decided to make the red bean soup as well because it looked easy and low-cost as well as tasty.

As it turned out, the soup was the easier to make than the cornbread which, while very it was a very straightforward recipe, didn’t have quite the right quantities. It needed more salt and less moisture. It was a little on the bland side, and, when cut, didn’t hold its shape very well. It was impossible to get the neat slices that were shown in the newspaper photograph.
 
Next time, I would add a good measure of salt and perhaps some chopped jalapeno. I’d also up the quantity of flour by about 50 – 100grams. On the night, however, I fixed the problem by slathering everything with salty melted butter and pretending that it was meant to be that way.
 
 
The lemon brownie recipe had suffered from a similar problem. It had evidently been through more than a few Facebook ‘shares’ and translations from imperial to metric and out again. It called for an 8” x 8” cake-pan, listed icing sugar in the ingredients section but referred to powdered sugar in the actual recipe and instructed that the sugar be ‘filtered’.
 
I did what I could to fix it up. In fact the first thing that I did were to double the quantities because otherwise there would not have been much to go around. Perversely, considering what happened to the cornbread, the mixture turned out to be too dry (or the oven was too hot) and the glaze too sloppy. I ended up with something more like my lemon sour cream syrup cake than a brownie (or blondie which is what I have been told is the technical term for a brownie mix that has no chocolate in it). It was fine to eat – superbly sour – but not as sticky through the centre as I’d hoped.


Kept overnight in the fridge, the blondies completely dried out. Happily, this problem was easily fixed by putting a couple of squares of chocolate (Lindt 70%) on top of them and sending them for a quick whirl in the microwave. The result – hot lemon and dark chocolate slice. I think this was better than the idea of a lemon blondie.
The recipes for the soup, cornbread, and blondies are all below.

Of course, in sharing these recipes with you, I thought I was being very modern, taking screen-shots with my phone, linking to various other sites, posting the recipes on my blog. It was all going to be so cool and hip and NOW.

Then a friend told me about how she collates all her online recipes on her Pinterest account which made me feel incredibly behind the times again.

Someone call Ursula Sedgwick and tell her I want my batwing blouse back...
 
Lemon blondies
Ingredients
  • 3/4 cup unsalted butter, melted
  • 1.5 cup plain flour
  • 4 eggs, beaten
  • 4 tbsps lemon zest
  • 4 tbsps lemon juice
  • 1.5 cups caster sugar
  • 1 tssp sea salt
  • (for the glaze)
  • 1 cup icing sugar
  • 4 tbsp lemon zest
  • 2 tbsp lemon juice
Directions
  • Preheat oven to 170C.
  • Grease and line a 18cm x 28cm slice tin
  • Zest and juice lemons and set aside
  • Cream butter and sugar until pale then slowly add beaten eggs one at a time until all combined. Add salt, lemon zest and lemon juice. Then slowly add flour until mixture is smooth and creamy.
  • Pour into slice tin and bake for 15 - 20 minutes checking every now and then. When just set around the edges, remove and allow to cool completely.
  • Sieve the icing sugar and whisk with the lemon juice until smooth. Add the lemon est. Spread this over the cooled blondies and allow to set.
  • Cut into bars and serve.
 Red Bean Soup
Ingredients
  • 2 tbsp olive oil
  • 1 onion, finely chopped
  • 3 garlic cloves, crushed
  • 2 red chilis, finely chopped
  • 1 litre vegetable stock
  • 750ml tomato sugo
  • 425g can of kidney beans
Directions
  • Heat oil in a large saucepan, add onion and cook for 2-3 minutes until soft. Add garlic and chili and cook for one minute.
  • Add stock, sugo, and kidney beans. Stir to combine. Bring heat to the boil, then reduce heat to a simmer for 25 minutes.
  • Serve hot with sour cream or crème fraiche.
Corn bread

Ingredients
  • 150g self-raising flour
  • 175g polenta
  • 100g goat's cheese, crumbled
  • 310g can creamed corn
  • 2 chilis, finely chopped
  • 1 tbsp chopped fresh coriander
  • 175ml buttermilk
  • 50g melted butter

Directions
  • Sift flour & polenta into a mixing bowl. Add goat's cheese, corn, chili, coriander, buttermilk, and butter.
  • Stir to combine
  • Transfer to a greased loaf tin and bake for 45 minutes.
  • Serve warm.

Wednesday, 7 August 2013

Mad scientists: matcha self-saucing pudding.

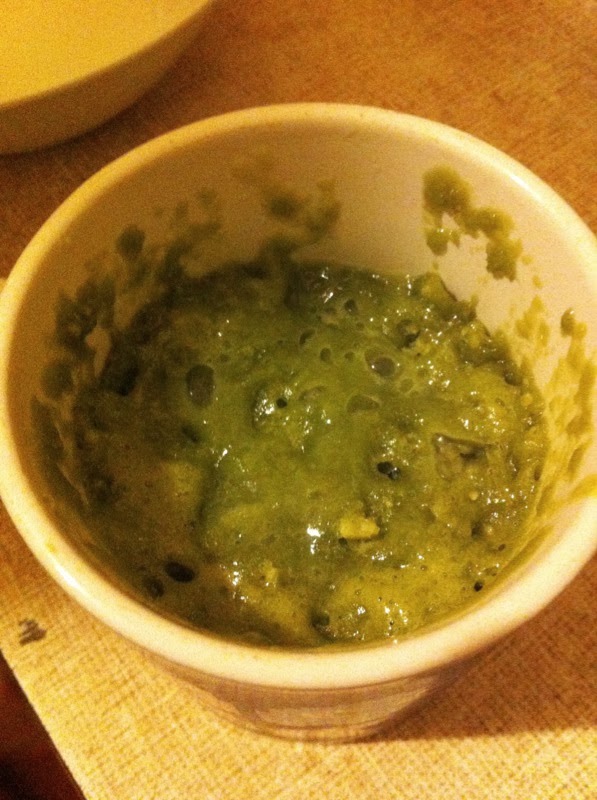
Warning: this post contains images that might be offensive to some readers.
 
12 year old and I were plotting. We needed pudding and we needed it stat! Problem – there was no pudding in the house and it was nearly bed-time for one of us.
“We could make one,” I said, reaching for my phone and opening up a search engine, “I’ve heard about self-saucing puddings that you can make really quickly in a coffee mug in the microwave.”
“Can we do that?” he said.
“Why not?”
We found this recipe that fulfilled all our requirements. It was a pudding, it could be done in the microwave. It was fast. Also it was about a mother cooking with her son, so it seemed appropriate.
“I’ll check if we have all the ingredients,” said 12 year old.
He pulled out the SR flour from the pantry, ran to get the milk from the fridge, grabbed the sugar bowl, reached for…
No cocoa powder.
But we did have the matcha latte left over from making the jasmine and matcha delice.


“That would be awesome,” he said.
We mixed it up, poured on the boiling water, and put it in the microwave, carefully setting the timer for 30 seconds. Then we watched through the glass as the mug moved around.
After the ping, we opened the door and peered into the mug.
“Doesn’t look like much has happened,” he said.
“Needs a bit more time,” I suggested, “10 or 20 seconds?”
“15,” he compromised.
But at 10 seconds, the mixture started to rear its ugly head over the rim of the mug. I hit the stop button and took it out, poked it with a finger.
“Seems cooked. Now we have to tip it into a bowl.”
We inverted the mug over the bowl. The pudding fell into it with a wet thunk.
There was a moment’s horror and a whisper of “It looks like someone sneezed” before we both started laughing. I honestly can’t remember the last time I laughed so hard. I had to cling to the bench-top to stop myself from falling over.
When people talk about primordial slime, they are probably thinking about something that looks like this.
 
I have never seen anything quite as grotesque in my kitchen before. It was like a parody of everything that I aspire to as an amateur baker.
“Who’s going to taste it first?” he said, wrinkling his nose.
“I will.”
I took a teaspoon and pushed it into the pudding. It was definitely pudding. It had definitely self-sauced. A trickle of pond-weed coloured liquid ran over the sides.
“It probably looks better when you use cocoa,” he said.
“Undoubtedly.”
But it tasted fine. Better than fine. I had some. He had some. We gave the rest to 16 year old who didn’t give a damn about the fact that it looked like a massive lump of snot. He finished it off and licked the bowl clean.
At bed-time, 12 year old was in a good mood.
“Did you clean your teeth?” I asked, “Get all that green stuff off them?”
“I did, “ he said, then, “That was really fun!”
“You have to experiment," I say in my best parental-fountain-of-wisdom-voice, “That’s how you learn.”
“And tomorrow, can you buy some cocoa?”
“First chance I get, darling. First chance I get.”

Perfect matcha: Secret Cake Club again!


Here’s how my day goes:

7am: tea – Taylors of Harrogate or Twinings Earl Grey (with milk, no sugar) or something herbal, peppermint is nice.

Between 9am – 11am (depending on how busy my day is) long black coffee or a cafĂ© mocha. Barista-made is best but there's a decent little machine at work.

Between 1pm - 2pm: another coffee

3pm: always tea

Upon arrival at home: tea again

I think of this as a balanced diet.

The mid-morning coffee and the 3pm cuppa are the most essential. You’ve heard the term ‘gasping for tea’? Well, by 3pm each day, I am not merely gasping, more moving into a state of extreme hyperventilation but with enough air to spare a snarl and a snort for anyone who gets between me and the kettle.

You can see then that the ‘Cuppa Joe’ themed Secret Cake Club is one that I had to attend. The idea was to either bake something using tea or coffee or that would go well with tea and coffee. This gave all the bakers a wide enough scope to do pretty much what they wanted.

My dilemma was a basic one: to use tea or coffee as an ingredient? Coffee is one of my favourite flavours especially when paired with chocolate. I love a coffee crème, I adore a coffee éclair, and a bitter-sweet tiramisu will not last long if I am around. However, I had never cooked much using tea although I am a great consumer of the drink, so I decided it would be interesting to extend my repertoire in this way.

I chose this matcha and jasmine delice simply because it looked so pretty. The strata of pale-green and white mousse on the pistachio base; the promise of delicate floral scent and the smokiness of tea; the richness of white chocolate – I was completely sold on the description.

The problem was that, gorgeous as the cake appeared, the recipe wasn’t particularly helpful. The pistachio cake, as described below, would have been better with either more flour or less butter. When I went to remove it from the oven, it was bubbling oil which I had to mop off with a piece of kitchen towel. I also ended up using a lined slice-tin as I wasn’t sure how I was going to layer the mousse otherwise.
For the pistachio cake base:

- 80g ground pistachios
- 80g butter, softened
- 75g sugar
- 1 large egg
- 1 small egg
- 10g cornflour
- 10g plain flour

1. Pre-heat your oven to 170 degrees celcius.
2. Cream the butter and sugar together.
3. Add in the large egg.
4. Fold in the sifted flours and ground pistachio mixture, a Tablespoon at a time.
5. Fold in the small egg.
6. Bake for 10-15 minutes on a sheet pan.

Note: my mould was quite small (8" by 8"), I'd recommend using a larger rectangular mould to yield a shorter cake as the layers are pretty rich.

The mousse was more straightforward. I’d been lucky enough to find titanium strength gelatine leaves while I was on holiday in Margaret River recently and bought a packet to bring back to the city with me. For the white mousse, I had a small packet of jasmine leaf balls. For the green mousse, I bought a tub of matcha latte rather than use straight matcha powder (which can be a tad intense).


I found that when I was making the mousse, the liquid did not actually stay hot long enough to completely melt the white chocolate. I had to resort to (gasp!) the microwave which I hate to use unless I absolutely have to.


Jasmine Mousse:
3T Hot water
2T Jasmine Leaves
2T glucose, or corn syrup
150g white chocolate
300g whipped cream, soft peaks
2 gelatine leaves, softened in cold water

1. Infuse the hot water with the jasmine tea leaves for 10 minutes. Strain this mixture.
2. Heat the tea along with the glucose until it comes to a boil.
3. Remove from heat and stir in the softened gelatine leaves. Pour this mixture over the white chocolate to melt it.
4. Fold in the whipped cream.

Matcha Mousse:
- Made using the exact same recipe and format, except you replace 2T of the jasmine leaves with 2T of matcha powder/green tea leaves.

Assemble the cake, first layering with half of the jasmine mousse and all the matcha mousse. Finish off with the remaining jasmine mousse.
 
The layering was also an issue. I had much more mousse than I needed and there was no instruction about whether or not I needed to chill it in between spreading on the layers. Those lovely clear strata? They were not to be. Everything was rather smudgy I wondered if there was enough gelatine in the mix. Next time I will use more. The left-over mousse was poured into bowls and allowed to set.

My trusty assistant and a bowl of left-over matcha mousse.
 
Taste test: first I sampled some of the left-over mousse. It was knock-me-down wonderful. What would have been overly-sweet as just a white chocolate mousse was nicely tempered by the bitterness of the matcha. The colour was very pretty - a pastel-green very reminiscent of sugared almonds. The jasmine version was also pleasant though not as strong as the matcha one. Then I cut myself a little section of the actual delice. Even without the clean layers, it was different and delicious. 

Layers somewhat obscured but the taste is the thing!

Secret Cake Club was held at Studio Bomba in Leederville and what a Secret Cake Club it was! The amazing Jacqui who organises Cake Club had recently done an interview on 720 ABC Perth and this, along with an ever-increasing social media presence, had pushed the number of attendees to the maximum.
The cut-up delice ready for Cake Club

There was a table full of cake, a sideboard full of cake, a mantelpiece laden with cake. There was coffee-cake, tea cakes, biscotti, donuts...


It was impossible to try every cake that was there, so I settled for trying a few (my absolute favourites on the day were the Portuguese tarts) and then playing "cake Tetris" where you artfully stack your Tupperware to ensure maximum take-home variety and quantity.

Cake Tetris - it's this random skill that I have.

It was great to have the space that Studio Bomba offered. They are a gift shop and art space as well as a cafĂ©, and this meant that  not only could we use their gorgeous studio for Cake Club, but also to shop for lovely things.

I came home with this:


The angle makes it look massive but it is actually a cute little pendant. We had a TV like this when I was little. And remember test cards?

It was great to be part of the new super-sized Secret Cake Club and I am looking forward to the next event which is cocktail themed. You all know that I am partial to a well-made cocktail.

Right now though, I'm gasping for tea.

My favourite mug. Bonus point if you know what the symbol represents...


The Strawberrythief - the real one

I couldn't resist posting this meme which was sent to me by the lovely Liv from Colpanna.

After I finished laughing, I started to worry that this might actually be what my ideal man looks like...

Enjoy!